
A common challenge developers face when working on a project is application hosting. I’ve found serverless solutions to be appealing for many reasons (scalability, no server maintenance, pay-as-you-go, etc.), but haven’t found a great migration solution—until now.
Zappa is a very easy-to-use Python package that helps you host your project on AWS Lambda and API Gateway. It’s as easy as set up, install, initialize, and deploy! In this article, I’ll go through how to host a simple flask app, and lastly, how to use a secure custom domain.
Set Up
The first thing we need to do is set up your AWS account on your laptop. For this step, you’ll need an IAM user set up for your AWS account.
- If you haven’t created an AWS account before, you can start here.
- To create an IAM user, you can follow these instructions.
In a terminal, create a file ~/.aws/credentials and enter the credentials.
If you have multiple accounts or IAM users that you would like to use, you can add them here. Zappa will be able to distinguish between multiple accounts.
#~/.aws/credentials
[default]
aws_access_key_id = [ACCESS_KEY_FROM_AWS]
aws_secret_access_key = [SECRET_KEY_FROM_AWS]

[org2]
aws_access_key_id = [ACCESS_KEY_FROM_AWS]
aws_secret_access_key = [SECRET_KEY_FROM_AWS]
Create another file ~/.aws/config and enter the preferred region.
#~/.aws/config
[default]
output = json
region = us-east-2

[profile org2]
output = json
region = us-west-1
Now create a project folder and a virtual environment with python3 if you choose. I’ll call my project zappa-demo and my virtualenv Zappa-Demo.
mkdir zappa-demo
cd zappa-demo
Install
Now we can begin with our project. Let’s start by installing dependencies and getting our flask application running.
Create a file called requirements.txt with flask and Zappa.
#~/zappa-demo/requirements.txt
flask
zappa
pip install -r requirements.txtCreate your flask application in a file called app.py
# ~/zappa-demo/app.py

from flask import Flask

app = Flask(__name__)

@app.route('/')
def hello_world():
    return "Hello World!"

if __name__ == '__main__':
 app.run()
Run your flask app and test by visiting http://127.0.0.1:5000 and view the “Hello World” message.
python app.py
                                                                                  (env: Zappa-Demo)
 * Serving Flask app "app" (lazy loading)
 * Environment: production
   WARNING: This is a development server. Do not use it in a production deployment.
   Use a production WSGI server instead.
 * Debug mode: off
 * Running on http://127.0.0.1:5000/ (Press CTRL+C to quit)
Now that flask is running okay, let’s work on setting up Zappa and migrating it to our AWS serverless architecture. Stop the web server with CTRL+C and continue on.
Initialize
Zappa is controlled by some CLI commands. You can view a full list of them using the help command.
zappa --helpFor us to get started, we will use the initialize command.
zappa initAfter the welcome screen appears, follow the series of on-screen prompts to create the initialization file. Leave the section blank to accept the default option.
First, enter an environment name. This is helpful when setting up multiple environments to separate production from others used for development and staging.
Welcome to Zappa!

Zappa is a system for running server-less Python web applications on AWS Lambda and AWS API Gateway.
This `init` command will help you create and configure your new Zappa deployment.
Let's get started!

Your Zappa configuration can support multiple production stages, like 'dev', 'staging', and 'production'.
What do you want to call this environment (default 'dev'):
Second, Zappa will recognize the profiles created in our ~/.aws/credentials file. Notice they ask if we want to use default or org2 that we set up at the beginning.
AWS Lambda and API Gateway are only available in certain regions. Let's check to make sure you have a profile set up in one that will work.
We found the following profiles: default, and org2. Which would you like us to use? (default 'default'):
During deployment, Zappa zips and moves your project to an s3 bucket. In step 3, enter the name of the bucket you would like to use. I prefer a naming convention like [PROJECT]_[ENVIRONMENT]_ZAPPA to keep things visually organized.
Your Zappa deployments will need to be uploaded to a private S3 bucket.
If you don't have a bucket yet, we'll create one for you too.
What do you want to call your bucket? (default 'zappa-f374x10rx'):
Next, Lambda needs to know what file is the executable file. Zappa recognized that our flask application was in a file called app.py and the initialization was called app also. They recommend app.app and we should accept this value.
It looks like this is a Flask application.
What's the modular path to your app's function?
This will likely be something like 'your_module.app'.
We discovered: app.app
Where is your app's function? (default 'app.app'):
The last step asks if we want global service. We will choose no for this.
You can optionally deploy to all available regions in order to provide fast global service.
If you are using Zappa for the first time, you probably don't want to do this!
Would you like to deploy this application globally?
(default 'n') [y/n/(p)rimary]:
Now that the init is complete, we have a zappa_settings.json file that has been generated for us.
Accept the values to continue.
Okay, here's your zappa_settings.json:

{
    "dev": {
        "app_function": "app.app",
        "aws_region": "us-east-2",
        "profile_name": "default",
        "project_name": "zappa-demo",
        "runtime": "python3.7",
        "s3_bucket": "zappa-f374x10rx"
    }
}

Does this look okay? (default 'y') [y/n]:
*As you are more comfortable with Zappa, you can create this file manually and skip the init step next time.
Deploy
Now that Zappa is configured, we simply run the deploy command.
zappa deployYou will see your app being packaged and pushed to AWS services. At the bottom of the output you will see “Deployment Complete” with a URL. Visit the URL to access your site.
Calling deploy for stage dev..
Creating zappa-demo-dev-ZappaLambdaExecutionRole IAM Role..
Creating zappa-permissions policy on zappa-demo-dev-ZappaLambdaExecutionRole IAM Role.
Downloading and installing dependencies..
 - markupsafe==1.1.1: Using locally cached manylinux wheel
 - sqlite==python3: Using precompiled lambda package
'python3.7'
Packaging project as zip.
Uploading zappa-demo-dev-1581976153.zip (5.4MiB)..
100%|█████████████| 5.71M/5.71M [00:37<00:00, 152kB/s]
Scheduling..
Scheduled zappa-demo-dev-zappa-keep-warm-handler.keep_warm_callback with expression rate(4 minutes)!
Uploading zappa-demo-dev-template-1581976197.json (1.6KiB)..
100%|█████████████| 1.62k/1.62k [00:00<00:00, 22.5kB/s]
Waiting for stack zappa-demo-dev to create (this can take a bit)..
100%|████████████████| 4/4 [00:12<00:00,  3.15s/res]
Deploying API Gateway..
Deployment complete!: https://haqlu0d376.execute-api.us-east-2.amazonaws.com/dev
Rename and Secure
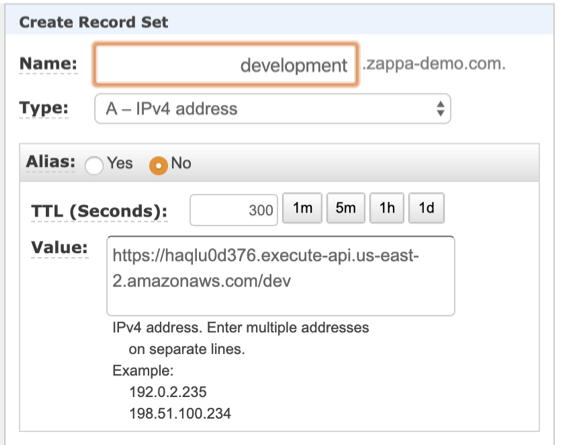
Now that we have our site created, we want a custom domain and to secure it with an SSL certificate. Create an AWS Route53 record with a domain that you own. Create a CNAME record you want to attach and enter the domain as the value.
Need to secure it with an SSL certificate? Use AWS Certificate Manager to create a certificate for your domain. (Check AWS Certificate Documentation for help.)
Once you have the certificate, update the zappa-settings.json file with certificate_arn and the domain you want to use.
{
    "dev": {
        "app_function": "app.app",
        "aws_region": "us-east-2",
        "profile_name": "default",
        "project_name": "zappa-demo",
        "runtime": "python3.7",
        "s3_bucket": "zappa-f374x10rx"
        "certificate_arn": "arn:aws:us-east-2:514021523585...",
        "domain": "development.zappa-demo.com"
    }
}
Now execute the Zappa certify command to set the certificate to your domain.
zappa certifyNow we can access our site at https://development.zappa-demo.com!
More
What if I update my code and need to push the change?
Simply run the update command.
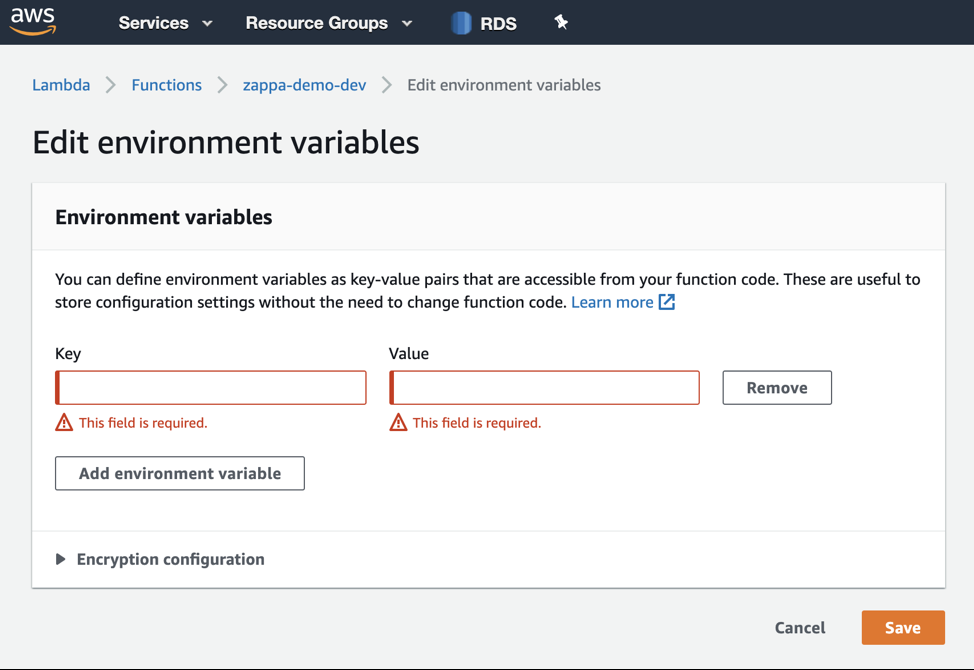
zappa updateWhat if I have environment variables I need to add to my application?
Visit the AWS Lambda, choose your region and function, click environment variables, and add as many as you need. This is what I use to connect to AWS RDS database service.
What if I want to delete everything?
There’s an undeploy command for that. It will delete the API Gateway and Lambda function.
zappa undeployQuestions?
Feel free to reach out to the product engineering team at InfoTrust today with questions about serverless Python web hosting on AWS, or to simply learn more about the unique technology projects taking place at InfoTrust.