What Is Firebase?
Firebase is Google’s Backend-as-a-Service (Baas) solution for mobile app development. Originally developed and launched in 2011 by Firebase Inc, it was later acquired by Google in 2014. Firebase started off as a realtime database, and now offers developers and marketers a comprehensive selection of tools and products that help develop advanced applications, as well as market them. The firebase platform allows for easy integration with IOS, Android, Web, and Unity products. There is a lot to learn about the platform, however in this article we will cover in-app messaging.
What Is In-App Messaging?
Firebase In-App Messaging allows you to target the active users of your app with various styles of customizable messages. The styles include cards, banners, models, and images. The diverse uses for in-app messaging range from getting users to subscribe, watch videos, complete levels, or buy items. Currently this feature is available for IOS, Android, and Flutter. In this article we will explore all aspects of in-app messaging including how to set it up, creating your first message, and reviewing the analytic features that are attached to this nifty tool.
Setup
Before starting, make sure to add Firebase to your Apple, Android, or Flutter project.
It is my opinion that the best documentation for adding the SDK to your project comes from Google itself; these are the links to get the SDK setup for Apple, Android, or Flutter.
Creating an In-App Message
The great thing for marketers is that the process of creating an in-app message is fairly simple. First, head to the in-app messaging feature located on the left-hand navigation. This will bring you to the in-app messaging dashboard where you will be able to create new campaigns, as well as check on the status of your old campaigns. To create a new campaign simply click on the blue New Campaign button.

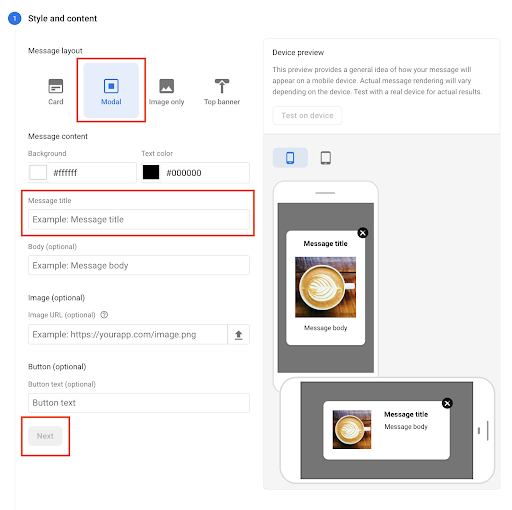
There are five steps to creating a new campaign, with two of them being optional. The first step is Style and Content. In this section you can choose from the following message layouts: card, modal, image only, or top banner. Each layout provides a different option about the content of the message. In this example, we will explore the modal layout. Generally all of the layouts (excluding image only) allow you to customize the background and text color of the message, as well as choosing the text for the message title and optional body text. When working with the modal layout, there is an optional choice for including either an image or a button. After choosing a message title, click Next.
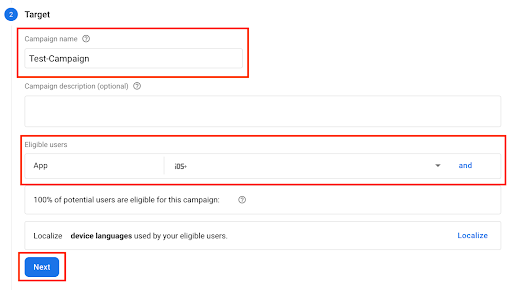
The next section is the Target. This is where you will customize the campaign name and description, which is useful when it comes to keeping track of the various campaigns you create. When naming your campaign remember to make it unique so you avoid confusion with your other campaigns. You can also choose which devices you send the message to. In this example, I have chosen to send out the message to IOS users only. When you are done with this section, proceed to the next step by clicking Next.
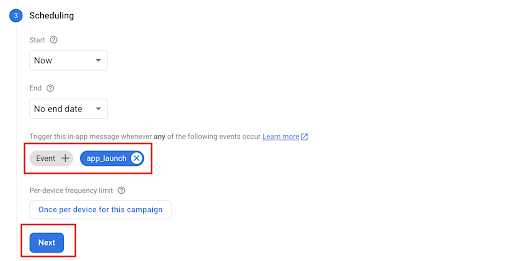
The next section is called Scheduling. In this section you are able to specify the timing of your campaign launch, as well as the conditions it is shown under (by conditions I am referring to the event that will trigger your campaign). In this example, I want my campaign to be active immediately and to trigger when my users launch my app. You can also configure how many times you want your message to show per device. Once you’re done with the scheduling section, you can click Next.
The following two steps are optional, the first being Conversion Events. This is where you can connect your campaign’s impressions or clicks with any of your conversion events. The final section, Additional Options, allows you to send additional information by means of a key/value pair to your app.


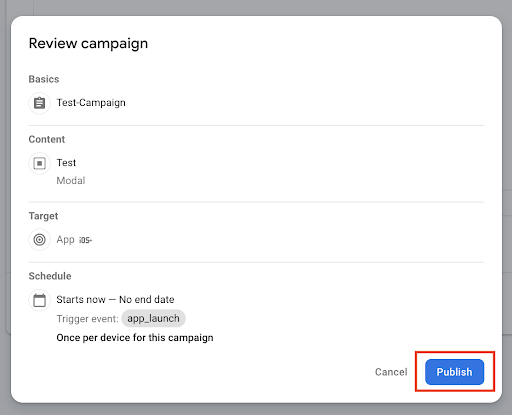
Once you’ve completed the necessary steps, you can click on the Review button. You will then be prompted to review your campaign and ensure everything meets your expectations. If you are satisfied with your campaign, click Publish and just like that you have created your first in-app messaging campaign.
Analytics
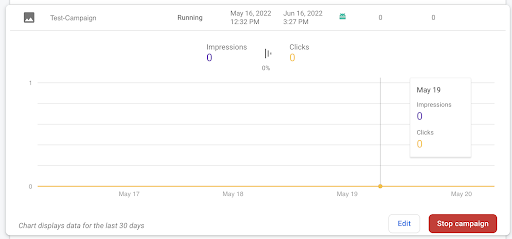
When it comes to analytics, in-app messaging allows you to track both the impressions of your customized messages, as well as the interactions through clicks. Additionally, when configured during the creation of your campaign, you are able to track conversions. One thing to note is that the chart only displays data for the last 30 days.
Conclusion
Firebase has an abundance of tools and features that are useful for both developers and marketers. If you haven’t already, check out my previous article on 5 Benefits of Using Firebase by Google. If you’d like to discuss the current and future setup for your mobile application tracking and analytics, reach out to the team at InfoTrust.

