

Accelerated Mobile Pages (AMP) are becoming increasingly popular across the Internet, as companies and websites try to deliver a faster, better user experience for mobile devices.
Why are AMP becoming so popular? I’m glad you ask!
By using AMP pages, search results can appear higher on the page in Google’s carousel. This can help increase visibility and clickthrough rates.
But up until now, a major issue with tracking AMP pages using Google Analytics has been related to identifying users. Because cached AMP pages showing up in Google’s search results are cached on a separate domain from your site, there was no way to pass clientId (a randomly generated alphanumeric that is used by GA identifies to identify unique users) from the cached AMP page in Google’s search results to your website.
See the diagram below for a better idea of the clientId issue:
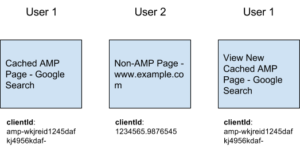
clientId is not passed from our cached AMP page in Google’s search result to our non-AMP pages, causing this user to appear as two users instead of one.
If you are tracking your AMP pages in the same Google Analytics property as your main website, this would have essentially counted that user twice, once on the Google-cached AMP page and once on your website.
Obviously, this is an issue, because I’m one user in reality, but showing up twice in Google Analytics because of this clientId limitation.
But I have exciting news! The AMP team, along with Google, has announced a clientId API where AMP and non-AMP pages can tap into to unify clientId. This means no more double-counting users moving from a cached AMP page to a non-AMP page. This is HUGE for publishers!
I’ve had a few of our publishing clients complain for almost a year now about this double-counting issue with no real solution in sight. Now, this update alleviates these concerns by tapping into an AMP clientId API to unify clientId’s across scenarios.
Implementation
It’s actually a very easy two-step process to set this up. First, you’ll need to add one line of HTML to all of your AMP pages:
<meta name="amp-google-client-id-api" content="googleanalytics"> |
The second step will be to update your Google Analytics code on non-AMP pages. If you are not using Google Tag Manager, you’ll need to update the ‘set’ command in your Google Analytics tracking code, like so:
ga('create', 'UA-XXXXX-Y', 'auto', {'useAmpClientId': true});
|
Notice the ‘useAmpClientId’ variable is added and set to ‘true’.
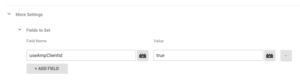
If you are using Google Tag Manager to add Google Analytics to your site, it’s an even easier update. In your Google Analytics tag(s), you’ll need to go to More Settings > Fields to Set and set the Field Name to ‘useAmpClientId’ with a value of ‘true’ (no single quotes):
Testing
To make sure this process works as advertised, you’ll want to make both updates as outlined above and start testing. The easiest way to do this is to use the Chrome browser and it’s mobile emulator tool in the Developer’s Console. To do this, press Option + Command + J (for Mac) or Cmd + Option + J (for you savage PC users) and click on the Mobile Emulator icon at the top left (highlighted in red in the screenshot below) and choose a mobile device model.
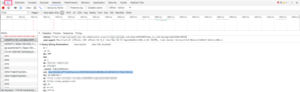
Cached AMP page’s pageview request – notice clientId starts with “amp-”
Now, you’ll need to find a cached AMP version of your site in Google’s search result and open that. You will then be viewing the AMP version of your page in Google’s search result.
To check your clientId, click over to the Network tab in your Developer Console and find the “collect?v=1&ds=AMP…..” request (see above screenshot). This is the Google Analytics request that is sending the AMP pageview (ds = data source). Scroll down in the Headers section to find the “cid” parameter which is your cliendId. You can see this one starts with “amp-”. This is your AMP clientId.
Now, on your cached AMP page, you’ll need to find a link that will take you to your regular, non-AMP website. Click on that link and then find the “collect?v=1” request again. This time it won’t include ds=AMP because it’s not an AMP page. You’ll want to look for the request with “t=pageview”.
It’s easier on your non-AMP page if you use the GA Debugger Chrome extension and find the pageview request that way and then check your clientId. See the below screenshot of GA Debugger and the pageview request.
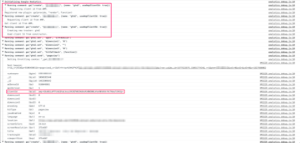
Non-AMP page’s Pageview request – notice clientId matches AMP pages clientId from previous screenshot
If your setup is working properly, the clientId should match what it was on the cached AMP page. This means your clientId has remained the same and you’ll be identified as one user. The clientId won’t always start with “amp-”. If you’ve been to the regular, non-AMP website before and been assigned a Google Analytics clientId (something like 12345699.12345676), then when you visit a cached AMP page in Google search, your clientId will stay as 12345699.12345676.
So, the testing process is a bit technical, but this way, you can ensure you are keeping the same clientId as you go from cached AMP page to regular, non-AMP page and back to cached AMP page. Pretty awesome!