There are a few out-of-the-box events that Google Analytics 4 (GA4) tracks but custom events require a bit more configuration. GA4 events are freeform and do not follow the category-action-label structure. Instead, you create an event with parameters. While setting up your parameters, it is good practice to think about any dimensions you wish could be included outside of the standard category, action, and label for data optimization. For example, if you are firing an event on a page load of a specific article or information page you can capture up to 25 elements of that page like time to read, article title, page path, article author, and article category. This empowers you to capture a more robust picture of your data and allows for more in-depth analysis. GA4 events require setup on both Google Tag Manager (GTM) and within the GA4 UI to effectively and accurately capture data.
I will preface that there are two options to set up events: through GTM or within the GA4 UI. For this article, we will focus on the GTM setup + the GA4 UI configuration. If you are interested in creating events through the GA4 UI, check out this article.
You will set up the GA4 event in GTM with the GA4 event tag type. You will then list event parameters under “fields to set.” You should always include hit_time_stamp and then add any other custom pieces (clinic_location, click_text, link_text), etc.
Set up
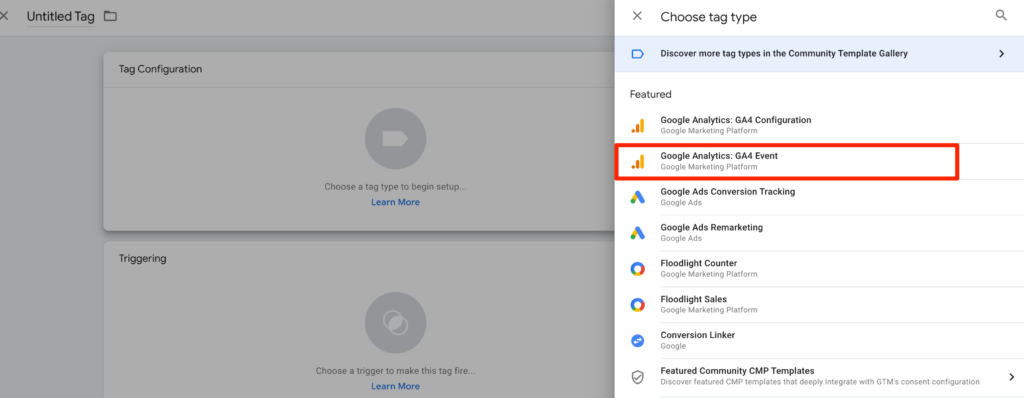
Create new tag + GA4 event.
Select the configuration tag that aligns with your GA4 data stream.
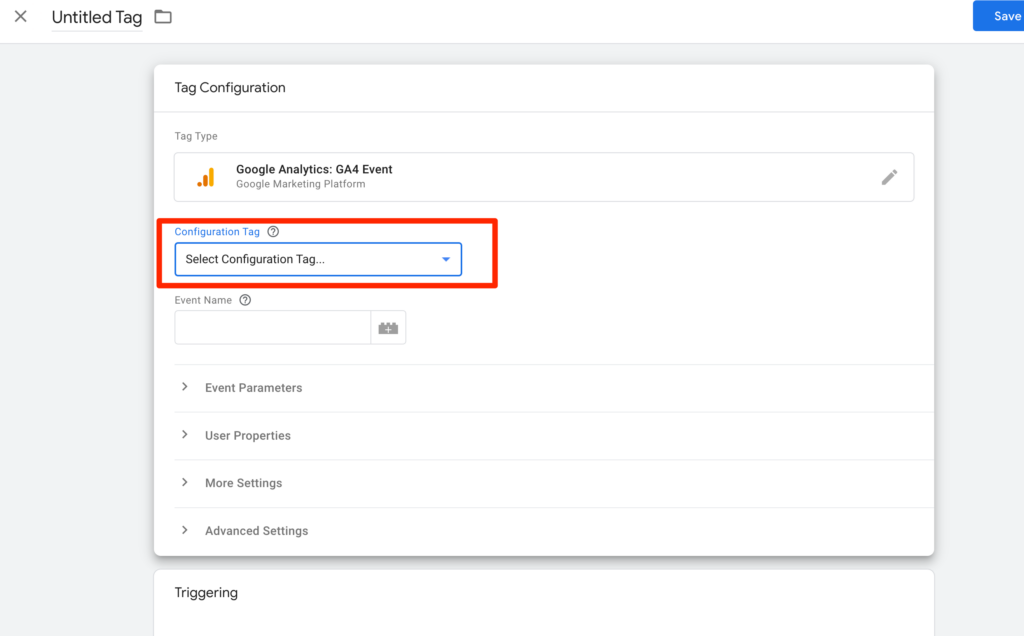
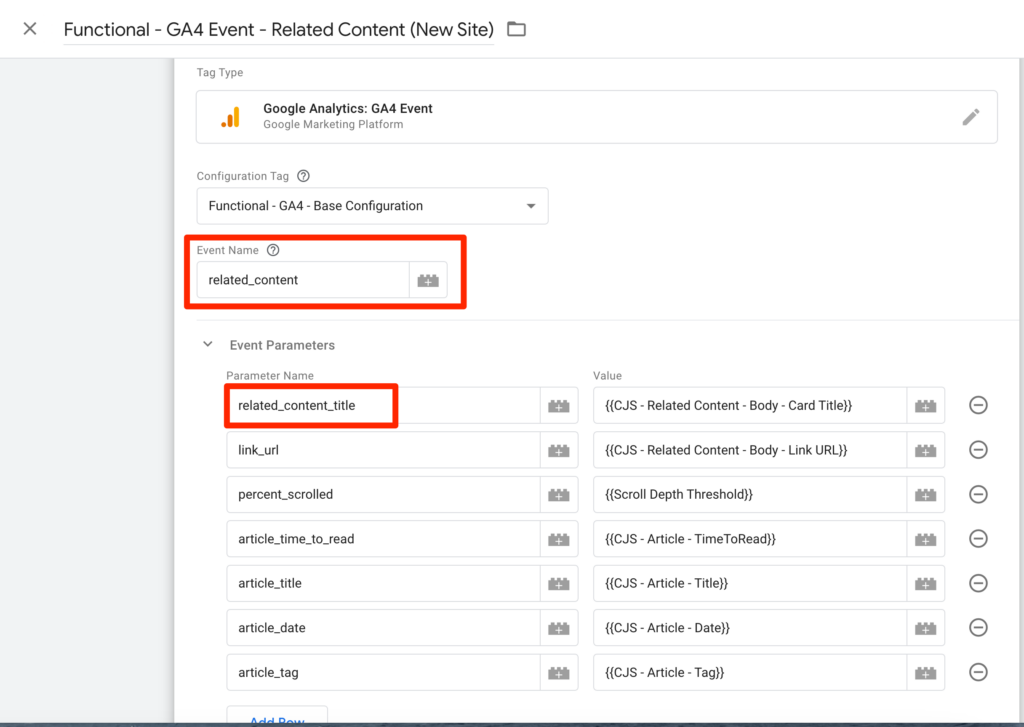
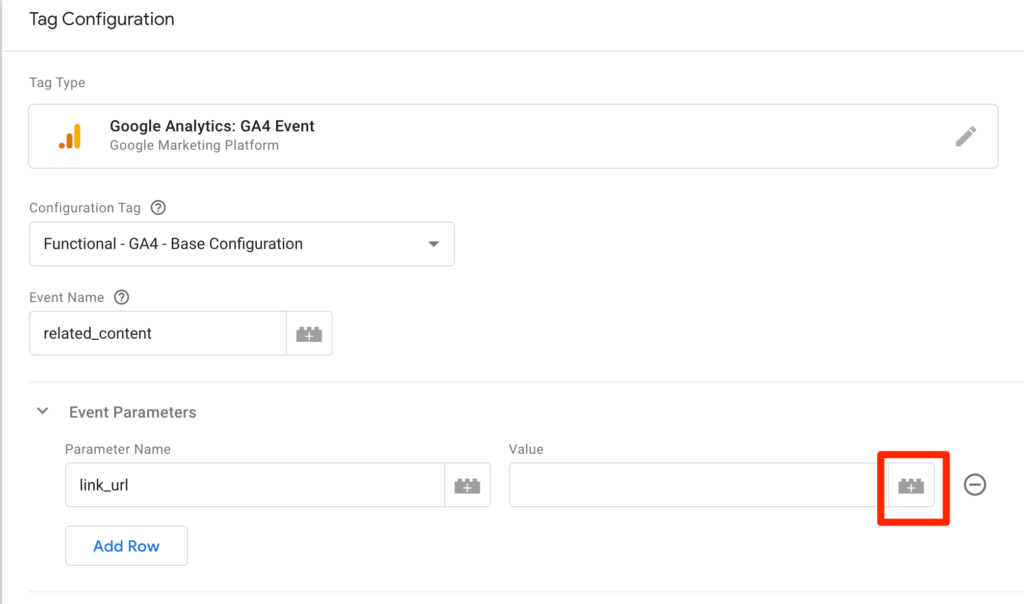
Name your event in snake_case (snake_case is the standard case used in GA4 and necessary for proper reporting). I recommend naming this event something that would align with the action the user is taking that is more descriptive than click, link, etc. It should be descriptive enough that you can differentiate between this action and others that happen on the site (schedule_an_appointment, related_content, cta, etc.).
Set up event parameters
Carefully selecting your parameters will help you optimize your data. What will you need in the future? What do you need right now? What are your KPIs for this data and what is this data’s purpose? What question will this answer? You should ask yourself these questions when designing your event and choosing what you want to bring into GA4. Below, I detail my reasoning for selecting the event parameters for my related_content event.
Choose parameters that you will find insightful for further analysis. These should also be entered in snake_case. I chose article date, tag, and time to read so I can analyze which articles perform better with a parameter I can use to compare these articles. The link URL tells me where the article lives on the site and GA4 has the page path dimension built in. So from these parameters + built-in GA4 dimensions, I can tell where the user found the article; where the article lives on the site; the article’s title, date, tag (category), time to read; and how far the user scrolled before they selected the related content article (click_text, link_url, article_title, article_date, article_tag, percent_scrolled, article_time_to_read.).
Then we will set up user properties (client_id, location, login_status, age, country). These user properties are useful to create audiences in GA4 and analyze the type of users that visit your site and how they access it. You set these up the same way as event parameters by adding the user property name in snake case.
From here, we need to “match” these parameters with their value. The value can be static or dynamic. Typically, you will reference a variable that you set up in GTM to match the parameter you entered, which will in turn feed these dimensions into GA4. At InfoTrust, we recommend using a dataLayer variable as this will be the most stable variable as opposed to scraping the DOM for a variable or using a CJS. However, that is not always possible for all GA4 users so we will go over both examples.
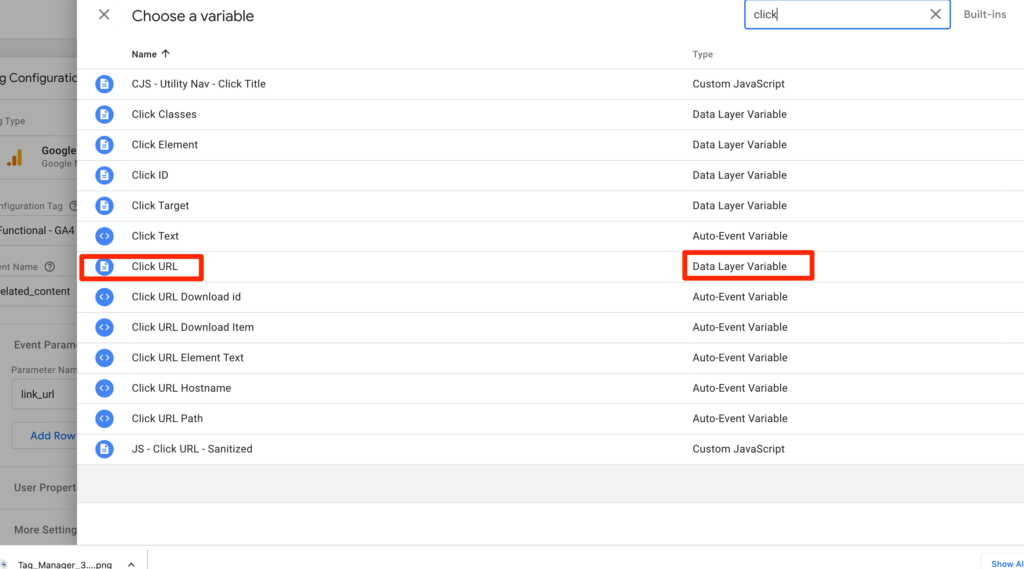
So, for example, let’s take link_url. This is a parameter that we can use click URL (a built-in variable) to show us what link the user clicked on. You will click the building block and choose a variable from there. This is where you will choose your variable, be it auto-event, dataLayer, CJS, or others.
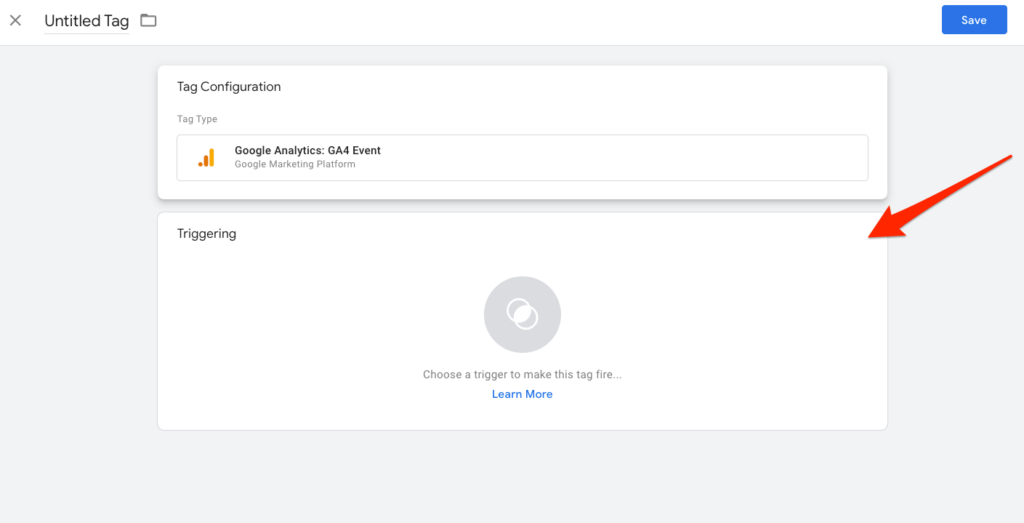
Continue to do this for each parameter name and value. Once this is complete, you will set up a trigger for the tag.
Choosing a trigger
Selecting a trigger for the tag is similar to a UA event setup. It is based on where you would like to see this event fire. Sticking with the related content event, I set this up to fire whenever a user clicks on a related content link. We typically recommend using a dL.push event to track custom events because they are more stable and reliable than CSS selectors. However, we understand that not all users have the ability to implement a dL push for every custom event. Therefore, I will walk you through both ways.
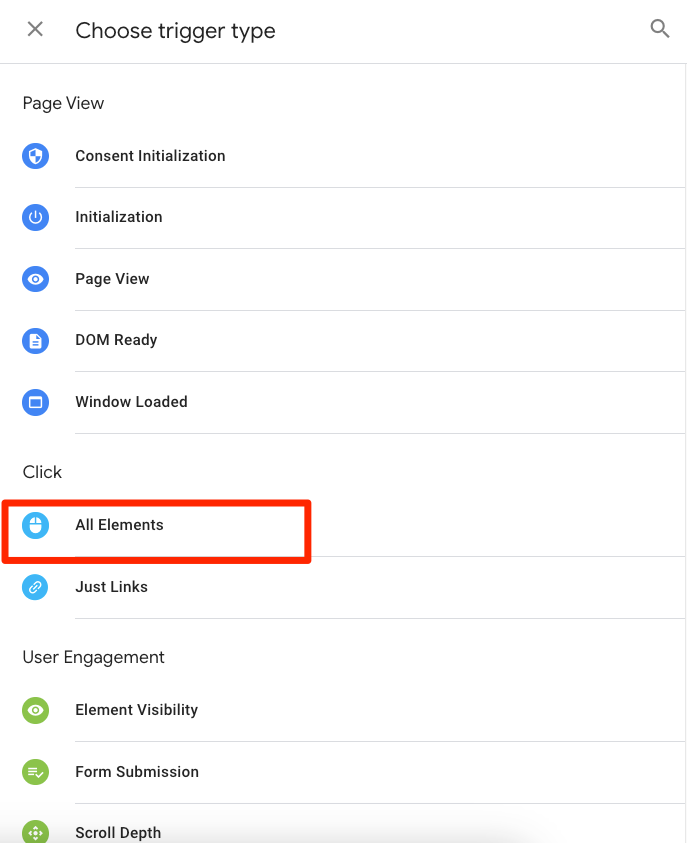
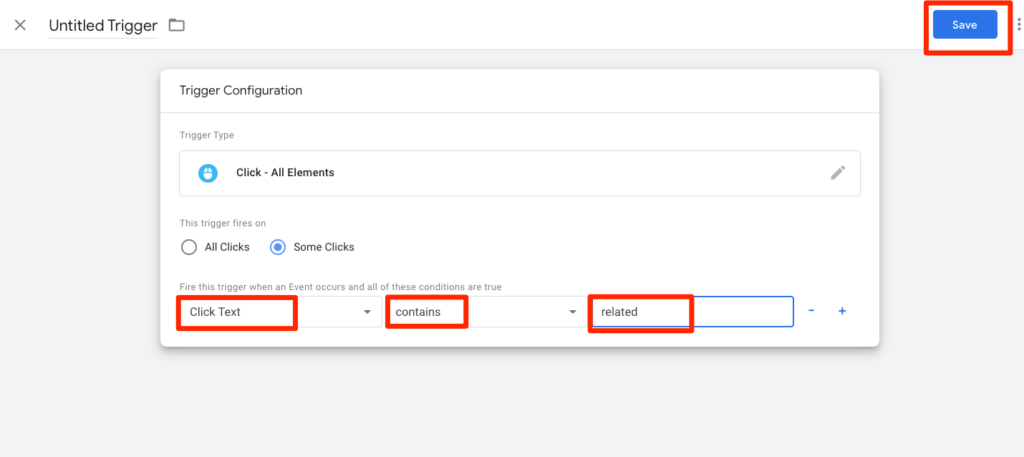
To set up Click Element Trigger, click into the trigger box under your tag creation box, and click the plus sign in the top-right corner to create a new trigger. From here, you will select the type of trigger you would like to set up. Some users use links, others use elements. Today we will focus on a simple trigger, click text. I chose click text contains “related” because it is the only element on the website that contains that word and will trigger my related content tag to fire. After this, name the trigger (type of trigger, what it is referring to) Click Element – Related Content, and save.

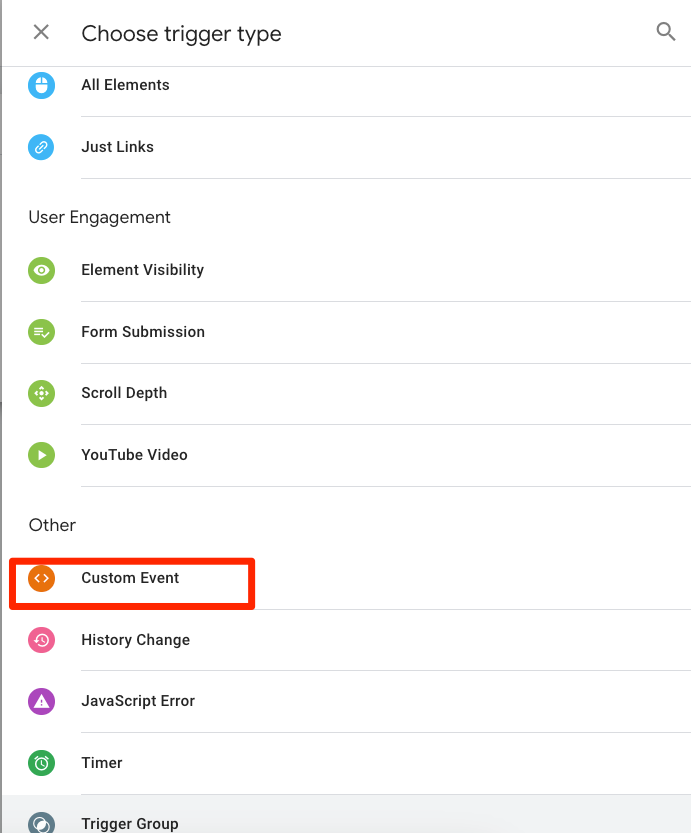
Set up custom event trigger for dL push
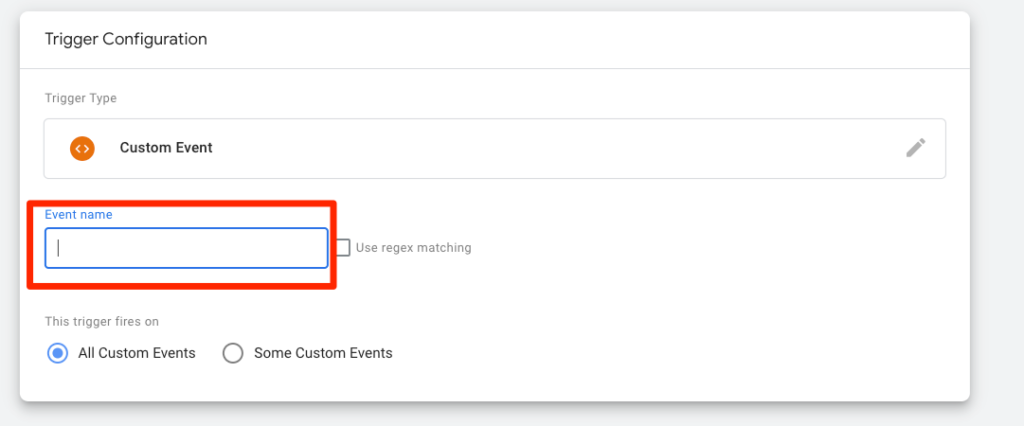
You will follow all of the same setup until you choose what type of trigger. Here, you will choose Custom Event and name it the event of the dL push. If working with developers, you should ask them to name the dL.push event in snake_case, as well for consistency’s sake across all platforms. After, you will enter the event_name of your dL.push. After your trigger is configured, it is time to QA your event in GTM. Time to move onto the GA4 UI to configure your event parameters as custom dimensions to ensure your parameters start feeding data into GA4.
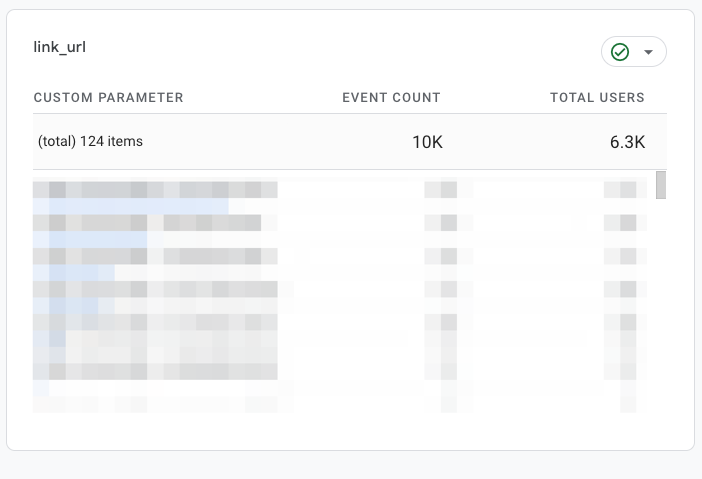
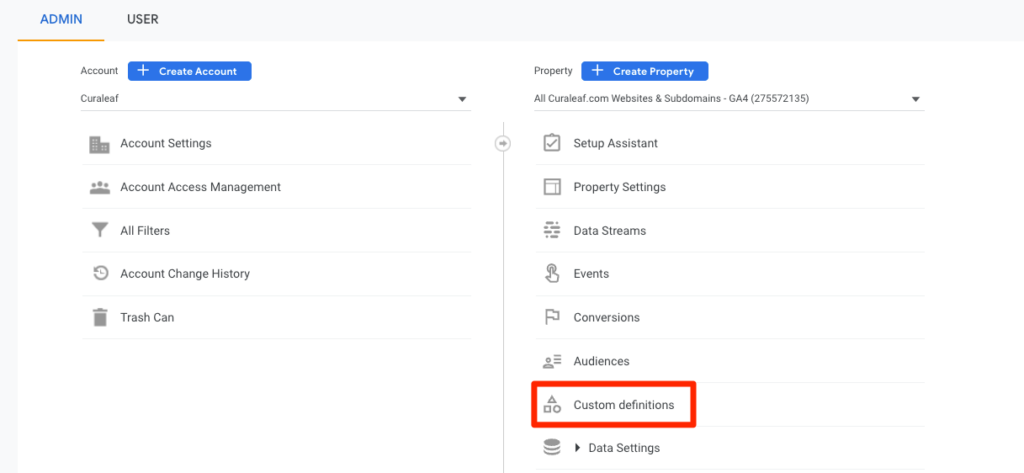
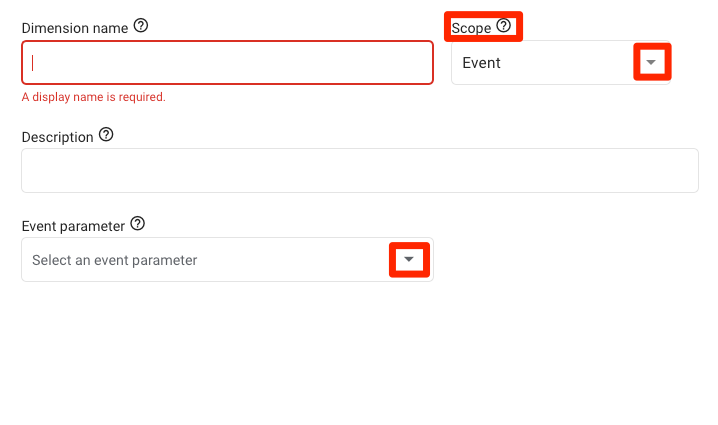
In GA4, you will add all of your parameters and user properties as custom dimensions. This allows the data to connect with what you have in GA4 and fill out your engagement reports. Navigate to the admin tab > custom definitions. Click “Create custom definitions”. Here you should ensure the scope matches which parameter or property you are entering. Event parameters are event-scoped and user properties are user-scoped. Continuing with our example, let’s include the event parameter link_url in the “Dimension name” box, event in the scope drop-down, and link_url under the “Event parameter” drop-down.
You will want the dimension name and event parameter to match so that they are easily distinguishable from other event parameters. Do the same for any user-scoped dimensions.
Note: the parameter/user property will not be available in the drop-down unless the GTM container has been published for more than 24 hours. You are welcome to type it is as long as it is exactly the same as the GTM parameter.

After these are published, you will start to see these event parameters data flow in after 24 hours. Navigate to your report from Engagement > Events > Click Event Name. Scroll and see all of your event parameters with data flowing! You can take this analysis a step to further optimize your data and customize your event report, re-create a UA behavior report in the explore report, or use some of these events as conversions.